
25 Charming Cocktails for Valentine’s Day Festivities
Alex & Sonja: The Culinary Team Behind A Couple Cooks
Introducing Alex and Sonja Overhiser, the vibrant pair behind the well-known culinary site, A Couple Cooks. As the creators of two highly regarded cookbooks, this real-life couple has been sharing their enthusiasm for cooking and straightforward, seasonal recipes since 2010. Their culinary adventure started with a mission to make cooking enjoyable and achievable for everyone, no matter their cooking skills.
Alex and Sonja embrace a cooking style grounded in simplicity and seasonality. They believe that the finest meals come from fresh, seasonal ingredients that are readily available and easy to prepare. This philosophy is evident in the thousands of unique recipes they have developed and shared throughout the years. Each recipe is carefully designed, tested with their family, and paired with breathtaking photography that embodies the spirit of their culinary innovations.
In addition to their recipes, Alex and Sonja provide a wealth of cooking advice and meal planning suggestions aimed at making kitchen life simpler and more enjoyable. Whether you’re a busy parent seeking quick weeknight meals or a beginner eager to grasp the essentials, A Couple Cooks caters to all. Their website is a treasure chest of ideas, featuring everything from hearty breakfasts and colorful salads to soothing soups and indulgent sweets.
Beyond their digital platform, Alex and Sonja have made a notable impact through their cookbooks. Each volume reflects their culinary journey, packed with personal stories, practical tips, and, undeniably, mouthwatering recipes. Their work has earned praise for its approachability, inventiveness, and the genuine happiness it brings to cooking.
As busy parents, Alex and Sonja recognize the difficulties of juggling family life with a passion for cooking. They frequently share insights into how they successfully cook together as a couple while involving their children in the experience. This personal touch creates a relatable and heartwarming aspect to their work, encouraging others to discover joy in family cooking.
In the fast-changing world of food blogging, Alex and Sonja Overhiser distinguish themselves with their dedication to quality, authenticity, and the pleasure of cooking. Their website, A Couple Cooks, remains a cherished resource for home cooks globally, presenting a delightful blend of recipes, tips, and inspiration that honor the art of cooking together.

Homemade Green Curry Tofu Better than Takeout
**Homemade Green Curry Tofu: An Excellent Substitute for Takeout**
Green curry is a cherished classic in Thai cooking, recognized for its lively hue, fragrant spices, and rich texture. Although takeout options for green curry tofu can be easy, preparing it at home delivers a superior culinary experience that is both gratifying and adaptable. Here’s why homemade green curry tofu can outshine takeout in taste, nutrition, and personal fulfillment.
**1. Fresh Ingredients and Taste Control**
When you prepare green curry tofu at home, you benefit from choosing the freshest components. Fresh herbs like Thai basil, cilantro, and lemongrass, in addition to top-quality coconut milk, can greatly elevate the flavor profile of your curry. You also have the power to adjust the spice level by varying the amount of green curry paste, enabling you to personalize the dish to your liking.
**2. Adaptable to Dietary Preferences**
Homemade green curry tofu is easily modified to accommodate different dietary requirements. Whether you’re vegan, gluten-free, or simply aiming to decrease sodium intake, you can alter the ingredients as needed. Choose low-sodium soy sauce, or opt for tamari for a gluten-free alternative. You can also incorporate various vegetables, such as bell peppers, zucchini, or eggplant, to boost the nutritional content and match your palate.
**3. Enhanced Tofu Texture**
In takeout options, tofu may occasionally be mushy or overcooked. At home, you can achieve the ideal tofu texture by pressing it to eliminate excess moisture and then pan-frying or baking it until golden and crisp. This method ensures that the tofu maintains its shape and provides a pleasing contrast to the creamy curry sauce.
**4. Cost-Efficient and Eco-Friendly**
Making green curry tofu at home is frequently more budget-friendly than ordering takeout. By buying ingredients in bulk or during sales, you can lower the overall cost per serving. Furthermore, cooking at home diminishes packaging waste linked to takeout, making it a more eco-friendly choice.
**5. A Fulfilling Cooking Journey**
Creating green curry tofu from scratch can be a gratifying experience that boosts your culinary skills. Playing with various ingredients and methods allows you to gain a deeper understanding of the intricacies of Thai cuisine. The act of crafting a dish from beginning to end can also be a soothing and satisfying endeavor, offering a sense of achievement.
**Conclusion**
While takeout green curry tofu provides convenience, the homemade variant offers a superior experience with respect to flavor, customization, and satisfaction. By utilizing fresh ingredients, adjusting the spice level, and perfecting the tofu texture, you can whip up a dish that not only fulfills your dietary preferences but also pleases your palate. Seize the chance to delve into the vibrant flavors of Thai cuisine in your own kitchen, and discover why homemade green curry tofu is a superior choice to takeout.

How to Create a Traditional Lemon Drop Martini
**Discovering Vodka Choices and Elevating Your Cocktail Experience**
In the realm of mixology, the selection of vodka can greatly influence the flavor and overall satisfaction of the beverage. Here, we delve into some premier vodka choices and how they can enhance your cocktail enjoyment.
**Vodka Choices:**
A high-quality vodka acts as the cornerstone for a harmonious cocktail. Some well-liked selections include Tito’s, Absolut, and Grey Goose. Each of these brands presents a unique taste and smoothness that pairs well with various mixers. For those seeking a citrusy note, citron vodka is an outstanding option, offering an added layer of lemon flavor without overwhelming the palate.
**Orange Liqueur:**
Orange liqueur plays a crucial role in numerous cocktails, contributing depth and richness. Cointreau is commonly preferred for its sophisticated flavor, but triple sec or Grand Marnier can serve as alternatives, each bringing their distinctive qualities to the combination.
**Modifying Sweetness:**
The sweetness level of a cocktail can be adjusted to match personal preferences. Those who lean towards a more tart drink can diminish the simple syrup to ⅓ ounce for the desired effect. On the other hand, amplifying the syrup to ¾ ounce will cater to those with a sweet tooth. It’s always wise to sample and modify as needed.
**Preparing for a Group:**
When mixing cocktails for a gathering, preparing in batches can save time and maintain uniformity. Simply scale up the amounts of vodka, Cointreau, lemon juice, and simple syrup based on the number of servings required. Keep the mixture in a pitcher and stir with ice prior to serving to ensure it’s chilled and refreshing.
**Creating a Yellow Hue:**
To achieve an eye-catching yellow color, consider using maple syrup as the sweetening agent or choosing citron vodka. While using simple syrup and regular vodka yields a clear drink, these alternatives can introduce a hint of color and enhance the visual presentation.
By thoughtfully choosing your vodka and fine-tuning other components, you can craft a cocktail that is not only tasty but also customized to your flavor preferences. Whether you’re relishing a serene night at home or hosting a vibrant gathering, these guidelines will assist you in preparing the perfect drink each time.

Trader Joe’s Chicken Shawarma Accompanied by Lemon Rice: A Tasty Meal Choice
### Simple Trader Joe’s Chicken Shawarma Bowls with Fluffy Lemon Rice
#### Introduction
Trader Joe’s chicken shawarma bowls offer a delightful and hassle-free meal solution, ideal for hectic weeknights. This dish features fluffy lemon rice, crunchy cabbage, and a creamy feta sauce, creating a tasty and fulfilling meal that is both quick and mouthwatering.
#### Why I Adore This Recipe
Inspired by the popular Naf Naf Grill, this homemade take on a chicken shawarma bowl uses Trader Joe’s pre-marinated chicken shawarma, making it an effortless dinner choice. The bowl is a powerhouse, highlighted by:
– **Lemon Rice**: Lightly fragrant, fluffy, and bright.
– **Crispy Chicken Shawarma**: Golden and savory.
– **Cabbage Slaw**: Almost pickled, offering a tangy crunch.
– **Feta Cucumber Sauce**: Creamy and invigorating.
This recipe is ideal for those who value convenience in the kitchen without compromising taste. It can be ready in under 45 minutes, making it perfect for busy nights.
#### Ingredients
– **For the Chicken Shawarma**: Trader Joe’s chicken shawarma (or homemade if you prefer).
– **For the Lemon Rice**:
– Rice
– Onion powder
– Garlic powder
– Salt
– Bouillon
– Water
– Lemon zest
– **For the Cabbage Salad**:
– Cabbage
– White vinegar
– Water
– Olive oil
– Salt
– Sugar
– **For the Feta Cucumber Sauce**:
– Grated cucumber
– Greek yogurt or mayonnaise
– Feta cheese
– Garlic
– Dill
#### Instructions
1. **Prepare Lemon Rice**: Sauté rice with onion powder, garlic powder, and salt. Incorporate bouillon and water, bring to a simmer, cover, and cook on low for 18 minutes. Fluff with lemon zest.
2. **Mix Cabbage Salad**: Blend cabbage, white vinegar, water, olive oil, salt, and sugar. Adjust to personal preference and let it rest.
3. **Create Feta Cucumber Sauce**: Combine grated cucumber, Greek yogurt or mayo, feta, garlic, and dill. Modify seasoning to taste.
4. **Air Fry Chicken Shawarma**: Cook chicken at 390°F for 9-10 minutes until golden and properly cooked. Chop into smaller pieces.
5. **Serve**: Plate the lemon rice, top with chicken shawarma, add a portion of cabbage salad, and finish with a dollop of feta cucumber sauce.
#### Frequently Asked Questions
– **What if I don’t have access to Trader Joe’s?**: You can make a homemade marinade similar to that in the chicken pitas recipe.
– **Can I use store-bought tzatziki?**: Yes, store-bought tzatziki is a great option and is available at Trader Joe’s.
– **Can I make this vegan?**: Substitute chicken with falafel, marinated chickpeas, air fryer tofu, or roasted vegetables. Trader Joe’s also has a vegan tzatziki available.
– **How long do leftovers last?**: Leftovers can be kept for 3-4 days. Keep ingredients separate for optimal results.
#### Conclusion
Trader Joe’s chicken shawarma bowls with lemon rice are an excellent choice for a quick and enjoyable meal. With minimal prep and cooking time, this dish is bound to become a favorite for busy evenings. Relish the vibrant flavors and the simplicity of preparation, making it a perfect addition to your dinner lineup!
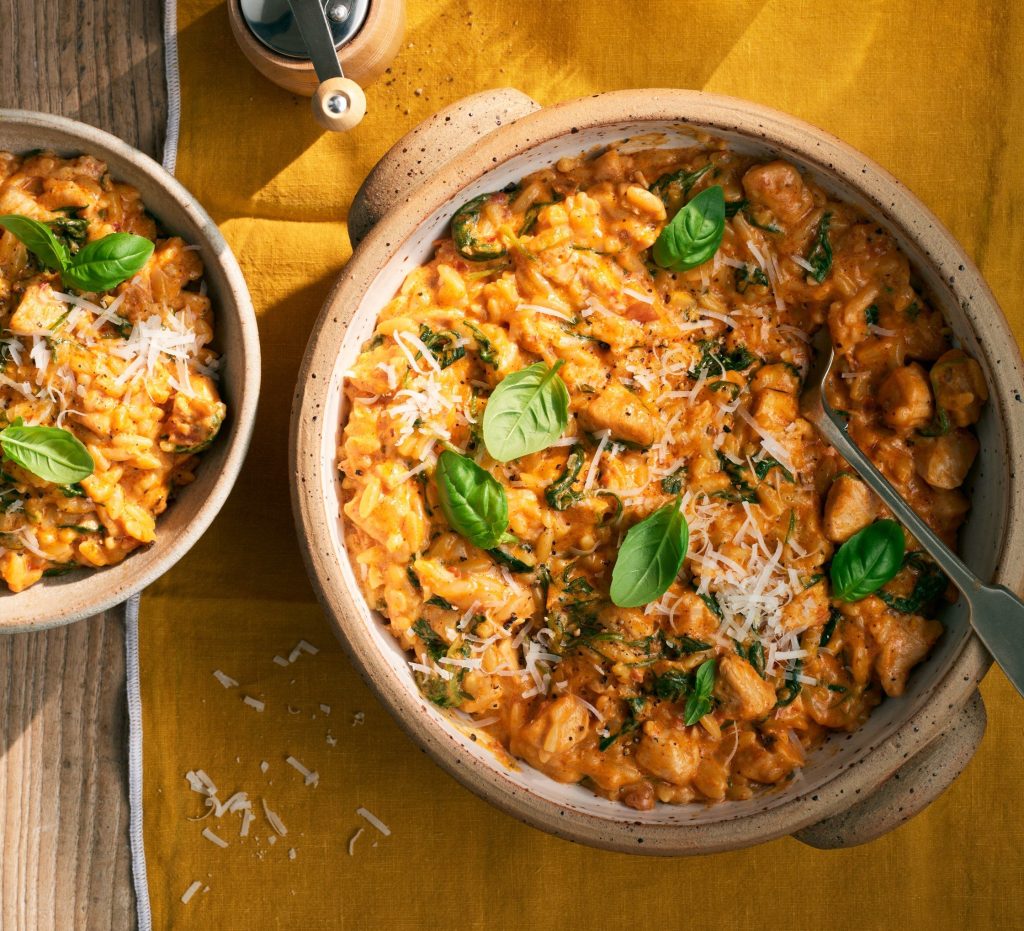
One-Pan Marry Me Chicken with Orzo: A Beloved Recipe for the Family
# Marry Me Chicken Orzo: A Cozy, Creamy One-Pan Meal
Marry Me Chicken Orzo is a scrumptious dish that blends creamy elements with delicious Mediterranean tastes, making it an ideal option for a cozy dinner. This one-pan recipe showcases tender orzo pasta cooked in a luscious cream sauce, enriched with sun-dried tomatoes, garlic, and Parmesan cheese. Each mouthful is full of flavor, justifying its title for the classic “Marry Me” taste that is bound to impress.
## Flavor Profile
The dish boasts a rich and creamy consistency, enhanced by the savory hints from sun-dried tomatoes and a touch of Parmesan cheese. This mix of ingredients results in a satisfying and delicious comforting meal.
## Time-Saving Tips
To simplify this recipe even further, consider utilizing pre-cooked chicken breasts or rotisserie chicken. This enables a swift preparation, as the orzo cooks in the same pot without needing to drain it.
## Serving Suggestions
For a refined dining experience, present the creamy chicken orzo with extra Parmesan cheese and freshly cracked pepper. When serving a larger group, complement it with homemade garlic bread and a Caesar salad to extend the meal.
## Meal Prep
Leftovers can be divided into single-serve containers for easy grab-and-go lunches. Adding fresh baby spinach on top of each serving will cause it to wilt while reheating, boosting the dish’s flavor and nutrients.
## Creamy Skillet Ingredients
1. **Sun-Dried Tomatoes**: Choose jarred tomatoes preserved in olive oil for optimal flavor and texture. The oil can also be utilized for sautéing in other recipes.
2. **Orzo**: This petite pasta cooks quickly and can be prepared right in the sauce, avoiding the need for a separate pot.
3. **Heavy Whipping Cream**: For a decadent sauce, opt for heavy cream. For a lighter alternative, half and half works too, though it may need a longer simmer to thicken.
4. **Cooked Chopped Chicken**: Use rotisserie chicken, leftover roasted chicken, or cooked diced chicken breasts for convenience.
5. **Grated Parmesan Cheese**: Freshly grated Parmesan melts beautifully and enriches the sauce’s flavor. Provide extra at the table for garnishing.
## Favorite Variations and Swaps
– Swap out the cooked chicken for leftover turkey, Italian sausage, or chicken thighs.
– Exchange spinach for chopped kale or thawed frozen spinach. Fresh basil can also be added for extra flavor.
– For a touch of sweetness, think about mixing in chopped roasted red peppers or frozen petite peas.
– Modulate the heat by excluding red pepper flakes or allowing guests to add their own.
– Boost Mediterranean flavors with a dash of Italian seasoning or oregano.
## How to Make Marry Me Chicken Orzo
1. Warm 1 tablespoon of the oil from the sun-dried tomatoes in a large skillet over medium heat. Incorporate garlic and basil, sautéing until fragrant.
2. Add chicken broth, orzo, cream, and sun-dried tomatoes. Bring to a boil.
3. Lower heat to a low boil, cooking uncovered for 12 to 14 minutes, stirring frequently until the orzo is tender and the sauce thickens. Add more broth if needed.
4. Mix in chicken, spinach, and Parmesan. Simmer for another 2 to 3 minutes until heated through.
5. Taste and season with salt and pepper. Allow resting for 2 minutes before serving. Serve with additional Parmesan if desired.
## Storage and Leftovers
Let leftover Marry Me Chicken Orzo cool before placing it in an airtight container in the refrigerator for up to 4 days. To reheat, gently simmer on the stovetop with a splash of chicken broth, milk, or cream, stirring frequently. The dish can also be frozen for up to 2 months; defrost overnight in the refrigerator and reheat with added liquid.
## Conclusion
Marry Me Chicken Orzo is a creamy, comforting creation that suits any occasion. With its rich flavors and straightforward preparation, it’s a meal that will undoubtedly win hearts at the dinner table. Enjoy this delightful recipe and share it with loved ones!

25 Charming Cocktails for Valentine’s Day Festivities
Alex & Sonja: The Culinary Team Behind A Couple Cooks
Introducing Alex and Sonja Overhiser, the vibrant pair behind the well-known culinary site, A Couple Cooks. As the creators of two highly regarded cookbooks, this real-life couple has been sharing their enthusiasm for cooking and straightforward, seasonal recipes since 2010. Their culinary adventure started with a mission to make cooking enjoyable and achievable for everyone, no matter their cooking skills.
Alex and Sonja embrace a cooking style grounded in simplicity and seasonality. They believe that the finest meals come from fresh, seasonal ingredients that are readily available and easy to prepare. This philosophy is evident in the thousands of unique recipes they have developed and shared throughout the years. Each recipe is carefully designed, tested with their family, and paired with breathtaking photography that embodies the spirit of their culinary innovations.
In addition to their recipes, Alex and Sonja provide a wealth of cooking advice and meal planning suggestions aimed at making kitchen life simpler and more enjoyable. Whether you’re a busy parent seeking quick weeknight meals or a beginner eager to grasp the essentials, A Couple Cooks caters to all. Their website is a treasure chest of ideas, featuring everything from hearty breakfasts and colorful salads to soothing soups and indulgent sweets.
Beyond their digital platform, Alex and Sonja have made a notable impact through their cookbooks. Each volume reflects their culinary journey, packed with personal stories, practical tips, and, undeniably, mouthwatering recipes. Their work has earned praise for its approachability, inventiveness, and the genuine happiness it brings to cooking.
As busy parents, Alex and Sonja recognize the difficulties of juggling family life with a passion for cooking. They frequently share insights into how they successfully cook together as a couple while involving their children in the experience. This personal touch creates a relatable and heartwarming aspect to their work, encouraging others to discover joy in family cooking.
In the fast-changing world of food blogging, Alex and Sonja Overhiser distinguish themselves with their dedication to quality, authenticity, and the pleasure of cooking. Their website, A Couple Cooks, remains a cherished resource for home cooks globally, presenting a delightful blend of recipes, tips, and inspiration that honor the art of cooking together.
Read More
Homemade Green Curry Tofu Better than Takeout
**Homemade Green Curry Tofu: An Excellent Substitute for Takeout**
Green curry is a cherished classic in Thai cooking, recognized for its lively hue, fragrant spices, and rich texture. Although takeout options for green curry tofu can be easy, preparing it at home delivers a superior culinary experience that is both gratifying and adaptable. Here’s why homemade green curry tofu can outshine takeout in taste, nutrition, and personal fulfillment.
**1. Fresh Ingredients and Taste Control**
When you prepare green curry tofu at home, you benefit from choosing the freshest components. Fresh herbs like Thai basil, cilantro, and lemongrass, in addition to top-quality coconut milk, can greatly elevate the flavor profile of your curry. You also have the power to adjust the spice level by varying the amount of green curry paste, enabling you to personalize the dish to your liking.
**2. Adaptable to Dietary Preferences**
Homemade green curry tofu is easily modified to accommodate different dietary requirements. Whether you’re vegan, gluten-free, or simply aiming to decrease sodium intake, you can alter the ingredients as needed. Choose low-sodium soy sauce, or opt for tamari for a gluten-free alternative. You can also incorporate various vegetables, such as bell peppers, zucchini, or eggplant, to boost the nutritional content and match your palate.
**3. Enhanced Tofu Texture**
In takeout options, tofu may occasionally be mushy or overcooked. At home, you can achieve the ideal tofu texture by pressing it to eliminate excess moisture and then pan-frying or baking it until golden and crisp. This method ensures that the tofu maintains its shape and provides a pleasing contrast to the creamy curry sauce.
**4. Cost-Efficient and Eco-Friendly**
Making green curry tofu at home is frequently more budget-friendly than ordering takeout. By buying ingredients in bulk or during sales, you can lower the overall cost per serving. Furthermore, cooking at home diminishes packaging waste linked to takeout, making it a more eco-friendly choice.
**5. A Fulfilling Cooking Journey**
Creating green curry tofu from scratch can be a gratifying experience that boosts your culinary skills. Playing with various ingredients and methods allows you to gain a deeper understanding of the intricacies of Thai cuisine. The act of crafting a dish from beginning to end can also be a soothing and satisfying endeavor, offering a sense of achievement.
**Conclusion**
While takeout green curry tofu provides convenience, the homemade variant offers a superior experience with respect to flavor, customization, and satisfaction. By utilizing fresh ingredients, adjusting the spice level, and perfecting the tofu texture, you can whip up a dish that not only fulfills your dietary preferences but also pleases your palate. Seize the chance to delve into the vibrant flavors of Thai cuisine in your own kitchen, and discover why homemade green curry tofu is a superior choice to takeout.
Read More
How to Create a Traditional Lemon Drop Martini
**Discovering Vodka Choices and Elevating Your Cocktail Experience**
In the realm of mixology, the selection of vodka can greatly influence the flavor and overall satisfaction of the beverage. Here, we delve into some premier vodka choices and how they can enhance your cocktail enjoyment.
**Vodka Choices:**
A high-quality vodka acts as the cornerstone for a harmonious cocktail. Some well-liked selections include Tito’s, Absolut, and Grey Goose. Each of these brands presents a unique taste and smoothness that pairs well with various mixers. For those seeking a citrusy note, citron vodka is an outstanding option, offering an added layer of lemon flavor without overwhelming the palate.
**Orange Liqueur:**
Orange liqueur plays a crucial role in numerous cocktails, contributing depth and richness. Cointreau is commonly preferred for its sophisticated flavor, but triple sec or Grand Marnier can serve as alternatives, each bringing their distinctive qualities to the combination.
**Modifying Sweetness:**
The sweetness level of a cocktail can be adjusted to match personal preferences. Those who lean towards a more tart drink can diminish the simple syrup to ⅓ ounce for the desired effect. On the other hand, amplifying the syrup to ¾ ounce will cater to those with a sweet tooth. It’s always wise to sample and modify as needed.
**Preparing for a Group:**
When mixing cocktails for a gathering, preparing in batches can save time and maintain uniformity. Simply scale up the amounts of vodka, Cointreau, lemon juice, and simple syrup based on the number of servings required. Keep the mixture in a pitcher and stir with ice prior to serving to ensure it’s chilled and refreshing.
**Creating a Yellow Hue:**
To achieve an eye-catching yellow color, consider using maple syrup as the sweetening agent or choosing citron vodka. While using simple syrup and regular vodka yields a clear drink, these alternatives can introduce a hint of color and enhance the visual presentation.
By thoughtfully choosing your vodka and fine-tuning other components, you can craft a cocktail that is not only tasty but also customized to your flavor preferences. Whether you’re relishing a serene night at home or hosting a vibrant gathering, these guidelines will assist you in preparing the perfect drink each time.
Read More
Trader Joe’s Chicken Shawarma Accompanied by Lemon Rice: A Tasty Meal Choice
### Simple Trader Joe’s Chicken Shawarma Bowls with Fluffy Lemon Rice
#### Introduction
Trader Joe’s chicken shawarma bowls offer a delightful and hassle-free meal solution, ideal for hectic weeknights. This dish features fluffy lemon rice, crunchy cabbage, and a creamy feta sauce, creating a tasty and fulfilling meal that is both quick and mouthwatering.
#### Why I Adore This Recipe
Inspired by the popular Naf Naf Grill, this homemade take on a chicken shawarma bowl uses Trader Joe’s pre-marinated chicken shawarma, making it an effortless dinner choice. The bowl is a powerhouse, highlighted by:
– **Lemon Rice**: Lightly fragrant, fluffy, and bright.
– **Crispy Chicken Shawarma**: Golden and savory.
– **Cabbage Slaw**: Almost pickled, offering a tangy crunch.
– **Feta Cucumber Sauce**: Creamy and invigorating.
This recipe is ideal for those who value convenience in the kitchen without compromising taste. It can be ready in under 45 minutes, making it perfect for busy nights.
#### Ingredients
– **For the Chicken Shawarma**: Trader Joe’s chicken shawarma (or homemade if you prefer).
– **For the Lemon Rice**:
– Rice
– Onion powder
– Garlic powder
– Salt
– Bouillon
– Water
– Lemon zest
– **For the Cabbage Salad**:
– Cabbage
– White vinegar
– Water
– Olive oil
– Salt
– Sugar
– **For the Feta Cucumber Sauce**:
– Grated cucumber
– Greek yogurt or mayonnaise
– Feta cheese
– Garlic
– Dill
#### Instructions
1. **Prepare Lemon Rice**: Sauté rice with onion powder, garlic powder, and salt. Incorporate bouillon and water, bring to a simmer, cover, and cook on low for 18 minutes. Fluff with lemon zest.
2. **Mix Cabbage Salad**: Blend cabbage, white vinegar, water, olive oil, salt, and sugar. Adjust to personal preference and let it rest.
3. **Create Feta Cucumber Sauce**: Combine grated cucumber, Greek yogurt or mayo, feta, garlic, and dill. Modify seasoning to taste.
4. **Air Fry Chicken Shawarma**: Cook chicken at 390°F for 9-10 minutes until golden and properly cooked. Chop into smaller pieces.
5. **Serve**: Plate the lemon rice, top with chicken shawarma, add a portion of cabbage salad, and finish with a dollop of feta cucumber sauce.
#### Frequently Asked Questions
– **What if I don’t have access to Trader Joe’s?**: You can make a homemade marinade similar to that in the chicken pitas recipe.
– **Can I use store-bought tzatziki?**: Yes, store-bought tzatziki is a great option and is available at Trader Joe’s.
– **Can I make this vegan?**: Substitute chicken with falafel, marinated chickpeas, air fryer tofu, or roasted vegetables. Trader Joe’s also has a vegan tzatziki available.
– **How long do leftovers last?**: Leftovers can be kept for 3-4 days. Keep ingredients separate for optimal results.
#### Conclusion
Trader Joe’s chicken shawarma bowls with lemon rice are an excellent choice for a quick and enjoyable meal. With minimal prep and cooking time, this dish is bound to become a favorite for busy evenings. Relish the vibrant flavors and the simplicity of preparation, making it a perfect addition to your dinner lineup!

One-Pan Marry Me Chicken with Orzo: A Beloved Recipe for the Family
# Marry Me Chicken Orzo: A Cozy, Creamy One-Pan Meal
Marry Me Chicken Orzo is a scrumptious dish that blends creamy elements with delicious Mediterranean tastes, making it an ideal option for a cozy dinner. This one-pan recipe showcases tender orzo pasta cooked in a luscious cream sauce, enriched with sun-dried tomatoes, garlic, and Parmesan cheese. Each mouthful is full of flavor, justifying its title for the classic “Marry Me” taste that is bound to impress.
## Flavor Profile
The dish boasts a rich and creamy consistency, enhanced by the savory hints from sun-dried tomatoes and a touch of Parmesan cheese. This mix of ingredients results in a satisfying and delicious comforting meal.
## Time-Saving Tips
To simplify this recipe even further, consider utilizing pre-cooked chicken breasts or rotisserie chicken. This enables a swift preparation, as the orzo cooks in the same pot without needing to drain it.
## Serving Suggestions
For a refined dining experience, present the creamy chicken orzo with extra Parmesan cheese and freshly cracked pepper. When serving a larger group, complement it with homemade garlic bread and a Caesar salad to extend the meal.
## Meal Prep
Leftovers can be divided into single-serve containers for easy grab-and-go lunches. Adding fresh baby spinach on top of each serving will cause it to wilt while reheating, boosting the dish’s flavor and nutrients.
## Creamy Skillet Ingredients
1. **Sun-Dried Tomatoes**: Choose jarred tomatoes preserved in olive oil for optimal flavor and texture. The oil can also be utilized for sautéing in other recipes.
2. **Orzo**: This petite pasta cooks quickly and can be prepared right in the sauce, avoiding the need for a separate pot.
3. **Heavy Whipping Cream**: For a decadent sauce, opt for heavy cream. For a lighter alternative, half and half works too, though it may need a longer simmer to thicken.
4. **Cooked Chopped Chicken**: Use rotisserie chicken, leftover roasted chicken, or cooked diced chicken breasts for convenience.
5. **Grated Parmesan Cheese**: Freshly grated Parmesan melts beautifully and enriches the sauce’s flavor. Provide extra at the table for garnishing.
## Favorite Variations and Swaps
– Swap out the cooked chicken for leftover turkey, Italian sausage, or chicken thighs.
– Exchange spinach for chopped kale or thawed frozen spinach. Fresh basil can also be added for extra flavor.
– For a touch of sweetness, think about mixing in chopped roasted red peppers or frozen petite peas.
– Modulate the heat by excluding red pepper flakes or allowing guests to add their own.
– Boost Mediterranean flavors with a dash of Italian seasoning or oregano.
## How to Make Marry Me Chicken Orzo
1. Warm 1 tablespoon of the oil from the sun-dried tomatoes in a large skillet over medium heat. Incorporate garlic and basil, sautéing until fragrant.
2. Add chicken broth, orzo, cream, and sun-dried tomatoes. Bring to a boil.
3. Lower heat to a low boil, cooking uncovered for 12 to 14 minutes, stirring frequently until the orzo is tender and the sauce thickens. Add more broth if needed.
4. Mix in chicken, spinach, and Parmesan. Simmer for another 2 to 3 minutes until heated through.
5. Taste and season with salt and pepper. Allow resting for 2 minutes before serving. Serve with additional Parmesan if desired.
## Storage and Leftovers
Let leftover Marry Me Chicken Orzo cool before placing it in an airtight container in the refrigerator for up to 4 days. To reheat, gently simmer on the stovetop with a splash of chicken broth, milk, or cream, stirring frequently. The dish can also be frozen for up to 2 months; defrost overnight in the refrigerator and reheat with added liquid.
## Conclusion
Marry Me Chicken Orzo is a creamy, comforting creation that suits any occasion. With its rich flavors and straightforward preparation, it’s a meal that will undoubtedly win hearts at the dinner table. Enjoy this delightful recipe and share it with loved ones!
Read More
Ground Chicken with Sweet Chili Sauce
Ground Chicken with Sweet Chili
Preparation Time: 5 minutes Cooking Time: 15 minutes Total Duration: 20 minutes Yields: 4
An effortless and speedy dish featuring ground chicken in a delicious sweet chili sauce!
ingredients
- 1 tablespoon cooking oil
- 1 pound ground chicken (or you can use beef or pork)
- 1 diced onion
- 1 diced red bell pepper (optional)
- 1 diced yellow bell pepper (optional)
- 4 cloves of garlic, minced
- 3 tablespoons sweet chili sauce (link)
- 2 tablespoons fish sauce
- 2 tablespoons lime juice (or can substitute with rice vinegar)
- 1 tablespoon oyster sauce
- 1 tablespoon chopped cilantro
- 2 green onions, sliced thin
directions
- In a skillet, heat the oil over medium-high heat, add the ground chicken and cook while breaking it apart, for about 5 minutes.
- Introduce the onion and bell peppers, cooking until softened, approximately 5-8 minutes.
- Stir in the garlic, sweet chili sauce, fish sauce, lime juice, and oyster sauce, combine well, and cook until aromatic, roughly one minute.
- Incorporate the cilantro and green onions, then serve and enjoy!
Suggestion: Serve on rice accompanied by cucumber, carrots, roasted peanuts, and extra sweet chili sauce!

Luscious and Tasty Slow Cooker White Chicken Chili Recipe
# Slow Cooker White Chicken Chili: A Heartwarming Family Dish
This slow cooker white chicken chili is a family-approved meal that’s easy to prepare and brimming with comfort. It’s ideal for serving a large group or stocking the freezer for convenient weeknight dinners.
## Taste Profile
– **Taste**: Creamy and comforting with succulent chicken, robust beans, sweet corn, and a mild, smoky heat in every spoonful.
– **Preparation Level**: Crafted with everyday ingredients, this straightforward slow cooker white chicken chili comes together swiftly with little effort.
– **Suggested Equipment**: This recipe is best executed in a 6-quart slow cooker to ensure even cooking and room to mix in the creamy bean blend at the end. An immersion blender gives the bean mixture a silky texture.
– **Make Ahead**: The flavors deepen and improve after a day, making it even more delicious. This recipe yields about 12 cups of chili, ensuring you have meals to enjoy throughout the week!
– **Freezer-Compatible**: Portion out servings to freeze for convenient lunches or quick dinners that can be reheated anytime.
## Ingredients for Crockpot Chili
– **Chicken**: Opt for boneless, skinless chicken breasts in this recipe. For a richer and more flavorful outcome, boneless, skinless chicken thighs may also be used.
– **Beans**: Incorporate just 2 cans of beans into the slow cooker and save the third for blending to enhance creaminess. Great Northern beans work well, but cannellini or navy beans are also suitable.
– **Corn**: Cream-style corn contributes sweetness and aids in thickening the broth. It serves as part of the soup base instead of simply adding more broth.
– **Cream Cheese**: Cream cheese establishes a creamy foundation. I prefer ⅓ less fat cream cheese, though full-fat cream cheese can be utilized for a richer, creamier outcome.
– **Green Chilies**: Mild diced green chilies infuse flavor with a gentle kick. For a spicier chili, opt for medium or hot green chilies.
## Additions and Garnishes
– **Creamy & Cheesy**: Shredded cheese, a spoonful of sour cream or plain Greek yogurt, or a drizzle of half and half introduces extra richness.
– **Fresh & Vibrant**: Chopped avocado, extra cilantro, fresh tomatoes, or green onions can be added just before serving.
– **Add Some Spice**: Extra jalapeños, a dash of cayenne, hot green chilies, or a splash of hot sauce can be included for a spicier bowl.
– **Crunchy Toppings**: Garnish each serving with tortilla strips, crumbled tortilla chips, crispy fried onions, or roasted corn kernels for added texture.
## Steps to Prepare White Chicken Chili in the Slow Cooker
This White Chicken Chili slow cooker recipe allows for hands-free cooking while ensuring an extra creamy result.
1. Prepare the ingredients for the slow cooker.
2. Cook until the chicken is tender, shred it, and return it to the slow cooker.
3. Blend the reserved bean mixture and mix it into the slow cooker.
4. Cook until thickened and creamy.
Add your preferred toppings before serving.
### Success Tips
– Allow the cream cheese to reach room temperature for effortless blending.
– Incorporate the bean and cream cheese mixture toward the end to avoid overcooking and graininess.
– If the chili exceeds your desired thickness, add a splash of warm broth or milk. If it’s too thin, let it simmer uncovered on high for a while to reduce.
– Frozen chicken breasts are usable, but for safety reasons, they should be fully thawed in the refrigerator before being added to the slow cooker.
– For a quicker alternative, cook everything except the chicken, then stir in shredded rotisserie chicken during the final 30 minutes just to heat through.
## Storing Leftovers
Store leftover white chicken chili in an airtight container in the refrigerator for up to 4 days. Freeze in labeled, freezer-safe containers or bags for up to 3 months. The chili may thicken slightly after thawing. If it has thickened too much, add a splash of broth or milk, then reheat gently on the stovetop over medium-low heat, stirring frequently.
## Warm Fall and Winter Chili Nights
This Slow Cooker White Chicken Chili is perfect for cozy evenings in, delivering warmth and comfort in every bowl. Savor this delightful dish with family and friends, and don’t forget to leave a rating and comment if you give it a try!

Recipes for Low-Carb Dishes
**The Top Low-Carb Recipes on Closet Cooking**
In light of the increasing interest in low-carb selections, Closet Cooking has assembled a comprehensive assortment of recipes aimed at those wanting to lower their carbohydrate consumption. With close to 500 low-carb recipes at your fingertips, the site presents a wide variety of dishes, guaranteeing that you can relish flavorful meals without sacrificing taste or diversity. Ranging from light and nutritious to quick and straightforward, these recipes include everything from breakfasts and snacks to dinners and sides.
**Breakfasts:**
Kick off your morning with wholesome and fulfilling low-carb breakfast choices. Recipes such as the “Keto Egg Muffins” and “Avocado and Bacon Breakfast Salad” offer a protein-rich beginning to your day, while the “Low-Carb Pancakes” provide a delightful variation on a beloved classic.
**Snacks:**
For those between-meal urges, Closet Cooking features an assortment of low-carb snacks. The “Cheese Crisps” and “Zucchini Pizza Bites” are ideal for a fast nibble, while the “Bacon Wrapped Jalapeño Poppers” introduce a zesty twist to your snacking.
**Dinners:**
Dinner selections are plentiful, with recipes like “Garlic Butter Shrimp and Asparagus” and “Zucchini Noodles with Pesto and Grilled Chicken” delivering tasty and hearty meals. The “Stuffed Bell Peppers” and “Cauliflower Fried Rice” make fantastic options for those wanting to savor a substantial dinner without the carbs.
**Sides:**
Enhance your main courses with delectable low-carb sides. The “Roasted Brussels Sprouts with Bacon” and “Garlic Parmesan Cauliflower Mash” are favorites that complement any dish.
**Appetizers/Soups/Salads:**
Discover a selection of appetizers, soups, and salads that are low in carbs yet high in flavor. The “Caprese Salad Skewers” and “Creamy Tomato Basil Soup” are ideal for kicking off any meal, while the “Greek Salad” provides a refreshing and nutritious choice.
Closet Cooking has simplified the process of finding these low-carb recipes by tagging and categorizing them for straightforward access. Whether you’re new to low-carb dining or an experienced veteran, this compilation offers limitless inspiration for every meal throughout the day. Immerse yourself in the realm of low-carb cooking and uncover the scrumptious options that await!
Read More
Recipe for Preparing Salt Bread
# Crispy, Tender, Fluffy, and Overflowing with Butter: The Ultimate Korean Salt Bread Rolls
Salt bread, referred to as sogeum-ppang in Korean, has seized the attention of the bakery scene, enchanting bread aficionados with its distinctive blend of textures and tastes. These rolls are more than just a snack; they create an experience that lingers in memory. With a crunchy crust, soft and gentle insides, and a delightful reservoir of melted butter at the heart, salt bread is essential for any bread lover.
## The Buzz is Authentic
Emerging from Korea and influenced by Japanese shio-pan, salt bread has established itself as a firm favorite in numerous Asian bakeries. Its fame is clear as enthusiastic patrons queue up for warm rolls, eager to indulge in the delectable treat that awaits. The charm of salt bread lies in its straightforwardness and the ideal harmony of butter and salt, rendering it a tempting option for many.
## What Constitutes Salt Bread?
At its essence, salt bread is a simple idea: bread with salt. However, its attractiveness arises from the lovely contrast in textures. The bread boasts a crunchy, crispy base that is butter-fried, while the upper part is soft and airy. The center is typically hollow, unveiling a concealed pool of butter that enriches each mouthful. In essence, think of salt bread as an upgraded crescent roll, made from a milk bread dough wrapped around a stick of frozen butter.
## Where Did Salt Bread Originate?
Salt bread is thought to be a Korean twist on the Japanese shio-pan, a flavorful, buttery bun. Nowadays, it is widely acknowledged as an “Asian” bread, often found in bakeries such as 85°C or dedicated salt bread shops. The internet has significantly aided in spreading the word about this delightful creation, with many eagerly anticipating their chance to enjoy fresh salt bread in Seoul.
## How to Craft Salt Bread
Creating salt bread is a fulfilling process that, although it demands some patience, is quite straightforward for those accustomed to bread-making. The crucial steps include preparing a milk bread dough, forming it into long triangles, and wrapping it around a frozen butter baton. As the bread cooks, the butter melts, producing a deliciously rich filling.
### Salt Bread Components
1. **Flour**: Bread flour is preferred for its elevated protein content, which helps develop gluten for a chewy feel.
2. **Water and Milk**: A blend of warm water and milk enhances the bread’s flavor and aroma.
3. **Egg**: Contributes richness and helps create a golden-brown crust.
4. **Yeast**: Instant yeast is suggested for convenience.
5. **Sugar**: A hint of sweetness that facilitates browning.
6. **Butter**: Vital for flavor, with two integrations: one in the dough and another as a filling.
7. **Salt**: Present in the dough and as a finishing touch.
### Step-by-Step Salt Bread Preparation
1. **Combine Ingredients**: In a stand mixer, add water, milk, egg, yeast, sugar, butter, flour, and salt in that order. Mix on low speed until unified, then knead on medium for about 15 minutes until the dough achieves the windowpane stage.
2. **Let the Dough Rise**: Shape the dough into a ball, place it in a lightly floured bowl, cover it, and allow it to rise until it triples in volume (approximately 1 hour).
3. **Prepare the Butter**: While the dough is rising, cut cold butter into small batons and freeze them.
4. **Form the Rolls**: Divide the dough into equal sections, shape each into a long triangle, position a butter baton at the base, and roll it up, sealing the edges.
5. **Final Rise**: Arrange the formed rolls on a baking sheet, cover them, and let them rise until they double in size (around 90 minutes).
6. **Bake**: Preheat the oven to 375°F. Spray the rolls with water, sprinkle them with flaky salt, and bake for about 15 minutes until golden brown.
7. **Complete**: Brush the tops with melted butter from the baking tray and allow to cool slightly before enjoying.
## Other Breads Worth Trying
If you savor salt bread, consider experimenting with other delightful bread recipes like:
– **Shokupan**: A soft and airy Japanese milk bread.
– **Croissants**: Flaky, buttery pastries that are a timeless favorite.
– **Brioche**: A rich and soft bread ideal for both sweet and savory recipes.
## Closing Thoughts
Creating salt bread is a delightful adventure that rewards you with the most scrumptious rolls you’ll ever taste. With its crisp exterior, soft interior, and buttery surprise, salt bread is suitable for any event. Dedicate some time to bake this bread and relish the wholesome experience it brings to your table. Enjoy your baking!
Read More
Succulent Chicken with a Glazed Caramel Finish
### Slow Cooker Chicken Drumsticks: A Meal Everyone Will Adore
When it involves family meals, locating a dish that everyone can agree on can be tricky. These slow cooker chicken drumsticks serve as the ideal answer—sweet, saucy, and remarkably simple to make with minimal effort.
#### Flavor Profile
Every bite of these drumsticks is coated in a smoky, sweet BBQ sauce with a touch of spice, making them a favorite among both children and adults.
#### Skill Level
This recipe is suitable for beginners, needing only a few basic ingredients and easy-to-follow steps.
#### Preparation Tips
– **Poke the Chicken**: Using a fork to create holes in the chicken allows the sauce to seep in more deeply, boosting the flavor.
– **Time-Saving**: On hectic evenings, just season the drumsticks, pour store-bought BBQ sauce over them, and let the slow cooker take care of the rest. This technique takes just a few minutes of prep time, with no need for browning or pre-cooking.
#### Serving Suggestions
Serve these tasty drumsticks with homemade cornbread and a simple green salad for a complete and uncomplicated weeknight meal.
### Key Ingredients
– **Chicken**: Choose skin-on chicken drumsticks for optimal flavor and texture. Bone-in chicken thighs can also be used as an alternative.
– **BBQ Sauce**: Pick your preferred BBQ sauce; Sweet Baby Ray’s is a well-liked option for its sweet and tangy taste, but feel free to explore smoky or spicy varieties.
– **Seasoning**: A Cajun seasoning mix works well, or you can prepare your own. Adding a dash of smoked paprika can enhance the smoky flavor.
### How to Cook Slow Cooker Chicken Drumsticks
1. **Prepare the Drumsticks**: Pat the drumsticks dry and poke each one several times with a fork.
2. **Season**: Evenly sprinkle the Cajun seasoning onto the drumsticks and rub it in to ensure coverage.
3. **Slow Cook**: Arrange the drumsticks in a single layer at the base of a 6-quart slow cooker.
4. **Add Sauce**: In a small bowl, combine the BBQ sauce, honey, and garlic powder, then drizzle it over the drumsticks.
5. **Cook**: Cover and cook on high for 2 to 4 hours or on low for 4 to 5 hours until the chicken is thoroughly cooked and tender.
6. **Optional Broiling**: For a sticky glaze and crispy edges, move the drumsticks to a foil-lined baking sheet and broil for 3 to 4 minutes until lightly caramelized.
7. **Serve**: Enjoy with additional BBQ sauce for dipping.
### Storage and Reheating
Store leftover drumsticks in an airtight container in the refrigerator for up to 4 days. To reheat, add a bit of extra sauce and warm them in an air fryer or under the broiler. For longer storage, cooled drumsticks can be frozen for up to 3 months. Thaw in the refrigerator and reheat in the oven until heated throughout.
### Conclusion
These slow cooker chicken drumsticks are not only simple to prepare but also tasty enough to please everyone at the dinner table. Enjoy a stress-free meal that unites the family!